Showing posts with label picture book dummy. Show all posts

Wednesday, August 30, 2023

Becky Gehrisch Creates a writing program for Camp

Last year Becky Gehrisch chatted with Kathy Halsey here at the GROG about her new book, Escape to Play. She mentioned that she did writing programs with kids for art camps and library programs, so I asked if she'd share some thoughts.  She did! Without further ado, here's Becky.

I've had the pleasure of teaching many classes on illustration, art, and writing but one specific example I’d like to share is the “Creating A Picture Book Dummy” class. The first thing I learned is to use any word except “dummy”! Kids just couldn’t get past that! I have renamed it “Get the Picture: How words in picture books are half the story!” A clever or engaging title is a fun way to engage an audience and pique their interest in a talk.

I adapted my writing camp talks to address kids of different age groups from ages 8-17. One set of classes were at the Thurber House, in Columbus Ohio. The Thurber House is a non-profit literary arts center and museum and is located in the home of humor writer - and cartoonist  - James Thurber. They offer camps, workshops, author presentations, and other literary events!

Many writing camps and programs have a submission form on their website or at their facility. For the camps I taught, I had seen an advertisement on social media for an upcoming writing camp for kids. I reached out through email and they directed me to the submission form. It was great timing and they liked my pitch!

I have found that presenting a slideshow helped the kids who are the auditory and visual learners. I broke down picture books that had great page turn and text placement. After the Fall by Dan Santat is an excellent example. We discussed the placement of text on a page, how words are chosen carefully, and how the illustrations tell half of the story. Good picture book writers don’t describe everything in a picture book. 
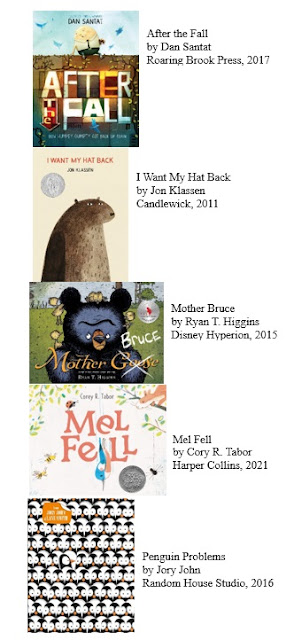
Becky's list of Great Examples
 I also showed some of my past book dummies to critique in the slide show. As a group, we looked at how I could have simplified the story, both by showing in the illustrations and precise word choices. We broke down the text by highlighting phrases in order to determine where on the page they should go and when a phrase or word could come after a page turn for emphasis or surprise. Later in the class they would break apart their own sentences and words this way.

I provided many picture book examples which demonstrate excellent storytelling and illustrations, especially those with fine attention to detail in both word choice and imagery. I took the time to read through a few and point out how the words were placed for a specific reason. Then the students could flip through these books during their working time to review how authors and illustrators choose their words and images carefully to further their story. This often included a secondary storyline in images. They saw how the images added to the story more than just mirror what the story was about. 

After these exercises, we moved on to tactile learning. To get the creative juices flowing, they could draw from a bowl of prompts for character, setting, problem, and emotion. Some kids had an idea already in mind but others who might be held up by idea paralysis, enjoyed pulling out random ideas to stitch together.

From their prompts and ideas, the students created their own picture book dummy or story. A great resource is Debbi Ohi’s picture book Dummy template. I have used this myself and it was great for kids to see how things are storyboarded. For the younger students, they worked on a larger format to accommodate their fine motor skill development. Students created a quick story and broke down their manuscript by how the words might work best with page turns. 

Coming prepared or having the organization provide the supplies and paper gave the kids plenty of choices in how they wanted to express themselves. To keep it simple, we used pencils with erasers if the ideas needed changed. Because time was limited, we avoided colorful writing tools and art supplies to focus on the words. Another class, geared toward illustration, would have an assortment of supplies to show off their creativity.

 The camp provided spiral bound writing journals and many kids chose these to brainstorm in. Folded and stapled “dummies” were put together ahead of time for the kids to see how the physical page turns affected their writing.

They could either focus on the writing side more or the illustrative side. There isn’t a right or wrong way. I encouraged them to find the best way that they could share their story. Some did better with images and others by outlining and mapping out their ideas. Folding blank paper helped to show physical page turns. 

The kids left the workshop with their own story idea, outline, illustration notes or sketches, and a picture book dummy which gives them a place to start to see how page turns work. Some left with a completed dummy while others just had a writing outline. Either way, they acquired a taste for the picture book writing process. Often, when our time was up, they had a hard time putting their pencils down. Now that was gold!

Teaching these writing camps for kids was such a rewarding experience. Not only was I able to share my knowledge and creativity with the next generation, but I also got to see their creative minds come alive. Teaching camps where kids willingly sign up is heaven. They already came with a passion for writing, so my job was simply to direct them. 

Whether you are planning a workshop or looking for ways to engage kids with picture book creation, I hope this can help you organize a successful class!

Thank you, Becky, for sharing your picture book dummy camp ideas. Learn more about Becky at her website, www.gehrisch-arts.com.

Monday, April 18, 2016

Turn that Picture Book Page! ~ by Patricia Toht

Webster's Dictionary defines a page-turner as "a book, story, etc., that is difficult to stop reading because it is so interesting." 

So, what makes for a great page turn in a picture book? What compels readers to flip to the next spread? 

Above all, a strong story will do the trick, a story that contains elements that propel action forward. Some involve:


• A trip, like this year's Newbery winner, LAST STOP ON MARKET STREET by Matt de la Peña and Christian Robinson. Readers want to know where the journey will ultimately end up.


• A quest, like SAM AND DAVE DIG A HOLE by Mac Barnett and Jon Klassen. Readers turn the page to discover if these diggers will find something spectacular, after all.


• Strong cause-and-effect. I can still remember that, as a small child reading THE CAT IN THE HAT by Dr Seuss, I actually held my breath when turning one particular page. On that page, the cat was balanced on a ball, holding aloft a huge, teetering tower of things. Could he possibly stay upright? I cringed and turned the page... Nope!


• An escalating problem. THERE WAS AN OLD DRAGON WHO SWALLOWED A KNIGHT by Penny Parker Klostermann and Ben Mantle is a prime example of escalation. The dragon keeps swallowing things, and his growing stomach discomfort surely cannot end well.


In addition to a strong story, or in quieter books or concept books, some other techniques can encourage page turns:

• The use of questions. The nonfiction book, WHAT DO YOU DO WITH A TAIL LIKE THIS? (by Steve Jenkins and Robin Page) uses this technique. To find the answers to this question -

   - readers must turn the page.


• Rhyme. With rhyme, a missing end rhyme will encourage the reader to guess the last word of the stanza, and then turn the page to confirm their guess. Take a look at Miranda Paul's new book, WHOSE HANDS ARE THESE?, illustrated by Luciana Powell. 
(*A warning here -- only write in rhyme if your story demands it and you work diligently to make all the elements of rhyme work. Here is a post on that topic.)


• Sparse text. The best example I can think of for this technique is YO! YES? by Chris Raschka. The entire book contains fewer words than most of my sentences! With few words, readers move forward quickly to add to the story. This book also uses the next technique -


• Alternating characters. With two characters that are fairly balanced in importance and appearance in the story, readers will keep turning the pages to see what is going on with the other character. HERMAN AND ROSIE by Gus Gordon is a personal favorite of mine.


• The use of a "page-turning word" and/or an ellipsis. Alice Schertle uses both in ALL YOU NEED FOR A SNOWMAN, illustrated by Barbara Lavallee. On the spread below, the word "then" followed by an ellipsis requires a page turn to complete the sentence and move things forward.


Picture book editors read tons of picture books and submissions of yet-to-be picture books, so many that they develop a feel, an internal rhythm, of where a page turn occurs. As they read your text, they will subconsciously break your picture book into spreads, adding page turns in their mind. 

You can develop that same feel, that internal rhythm. You can also encourage page turns. How?

#1 READ LOTS OF PICTURE BOOKS

#2 MAKE A DUMMY OF 
YOUR PICTURE BOOK TEXT

#3 INCORPORATE ELEMENTS 
TO ENCOURAGE PAGE TURNS

Never made a dummy before? Don't worry - there's a post for that, too! Check it out here.


So what is your favorite page-turner picture book, GROG readers? Does it include any of the elements above? Something else?

Tuesday, July 28, 2015

PLEASE USE THE D WORD ~ by: Jackie Wellington

Growing up I wasn’t allowed to use the D word. Not that one. The other one. Yes, dummy. It always had such a negative connotation. I can still hear Momma's words echoing in my ear. “You say that again and I’m going to wash your mouth out with soap.” Well, that was years ago.
Today, saying the D word is encouraged, especially if you’re a picture book writer. For instance, less than a month ago, I was at the WOW Retreat in Helen, Georgia. In our round table group session, one of the writers looked at me and said, “You can read rhyme, right?” I said yes and she handed me her picture book manuscript.
Normally, I would have time to read the manuscript, establish a rhythm in my head, and recite the story like I was a rapper at a freestyle battle. But that was not an option; no dropping the mic and walking off the stage. I was to read it aloud, in front of an agent and three other writers, right then and there. At that moment,  I took a deep breath and read, only fumbling a few times. I did my best. Honestly!
When it was time to discuss the manuscript, the agent who was facilitating the round table referenced a section and said, “I didn’t get it.” At that time, the writer went in her bag, pulled out a dummy, and handed it to the agent. The agent inspected the dummy, flipping through the pages. Then the agent looked at the author and said, “Aah. I didn’t get that when it was read.” It was that moment I realized the importance of a dummy. It helps others to visualize your words, your sentences, your story.
The standard picture book dummy have thirty two pages.  A few pages left for the publisher to do their housecleaning. Try making a dummy. Start your story on page four or five. Cut your manuscript up and fit it on the pages. It sounds easy, but trust me, it isn't.
I have heard about writers making dummies as they write. I have met some who swore to a dummy’s effectiveness. Me, I have never made a dummy, and there are reasons for that. One, I cannot draw. Two, I cannot draw. Three, I cannot draw. 
For me, I could not conceptualize any other way to make a dummy without drawing. So I never attempted to make one. But I am always learning from other writers. This writer taught me you do not have to be an artist to make a dummy. She uses clip art or cut pictures from books, magazines, and the computer. Now I am fascinated.
One of the sessions, the lovely Denise Fleming taught the attendees how to make a dummy. I was so ecstatic to do so. When I got home, I took a twelve hundred word historical fiction manuscript and created a dummy. This process allowed me to cut three hundred and thirteen words from that manuscript. I know right? Unbelievable. WOW...That was all I could say.
So thanks to all those writers who inspire and encourage me to make dummies. Thanks for helping me visualize my words, my sentences, my story. 
To all of you, I am grateful! I am honored to join a group of writers who believe in dummies. And I am happy to join a group of writers who knows it is okay to use the D word. 
If you would like to learn how to make a picture book dummy, check out Shawna J.C. Tenney below or click here.  Google images of picture book dummies. I do not have permission to share them here; but there are plenty on the internet for you to browse.


Bibliography
Shaskan, Stephen. "32 Page Picture Book Dummy Template." Stephen Shaskan. N.p., 15 Nov. 2013. Web. 28 July 2015.

Wednesday, April 1, 2015

Studying Picture Books with a Dummy

by Leslie Colin Tribble

A writing friend recently posted in a Facebook group that she’s been studying 3-5 picture books a week and discovered some enlightenment on how to revise a couple of her current manuscripts. I was intrigued. How does one study a picture book, other than reading it? Her advice was to create a picture book dummy or storyboard and analyze the text for pacing, repetition, flow and placement of illustrations.

Patricia Toht's own picture book dummy


I headed off to my library and snagged some new picture books. Then I made a picture book dummy, as described by our own Patricia Toht, for each book. Here are the books I read and what I learned.


This book just ate my dog! 
Written and illustrated by Richard Byrne

This was a really cute book, coming in an amazing 114 words. The text is simple, the layout is simple and the illustrations are simple but in a very compelling way. I had the book laid out at 34 pages, but Amazon states it has 40 pages (maybe the UK edition?). The page turns happen as different animals, individuals and vehicles disappear into the book. There’s a very slight twist at the end, pulled off solely by the illustration. There were nine pages of illustrations only. The sparseness of the text was a good lesson!


A Moose that Says Moo 
Written by Jennifer Hamburg and illustrated by Sue Truesdell

This rhyming book contains 329 words with only five pages without text. I’ve never even attempted to write in rhyme so I made a point of really analyzing this book. Almost each line contained a meter of 11 beats with rhyming end words. Some pages had two lines of four beats followed by a line with 10 beats. That broke up the basic pacing and provided interest. The rhyme and rhythm make this a great read aloud, which is probably why this book is on the short list for the Wyoming State Library Association and State Reading Council Favorite Book Award by children in kindergarten through third grade.


Winter is Coming 
Written by Tony Johnston and Illustrated by Jim LaMarche


This book reads like a nature journal as written by the girl in the illustrations. Each spread had text on the left and illustrations on the right and came in at a whopping 751 words. This is one of those fiction/non-fiction books as the text provides factual information about various animals getting ready for winter, but reads like a story. I loved this book. If I had owned this book growing up it would have been a favorite because I would have wanted to be the main character, living in the country and keeping a nature diary. After reading this book a few times I started noticing the vivid, action words that show, not tell.  


These are some of the sentences which caught my eye:

“Ice is in the air.” How much better is this than, “The air is cold.”

“The fox shines like a small red fire.” Not “The fox is red.”

Bear movement is described as rustle, snuffle, searching. These are much more exciting words than walking, sniffing, looking.

Woodpeckers hammer, scrounge and riddle. The lynx ghosts along and has Egypt eyes. What great image words!

The refrain, “Winter is coming,” carries the sense of time forward and is used 12 times in 14 page spreads. The author often uses the word “quiet” to describe action in both the animals and the girl. And isn’t fall a quietly expectant season as the world waits for the first flakes of winter snow?


Wolfie the Bunny 
Written by Ame Dyckman, Illustrated by Zachariah Ohora

I loved everything about this book! It has great illustrations with a huge range of emotions on the cutest bunny faces and a fast, snappy text to boot.  This book has 364 words with two repeating phrases used to carry the theme. What I appreciated most about this book was the clever use of just the right words. 

Here are some examples:
“Dinner!”  Instead of saying, “The Bear grabbed Wolfie for dinner.” The author just used one succinct word to get the idea and emotion across.

Wolfie pounced.” Not “Wolfie wanted to hug Dot.”

“Instead, she ran forward.” This is all action with no telling. I probably would have written something like, “Dot wanted to save Wolfie so she ran to the Bear.”

I really learned a lot by pouring over these books. Studying picture books is a great way to understand the difference between “showing not telling.”


If you’re still unclear about story boards or dummies you can read more about them. Tara Lazar has an interesting post that talks about picture book lay out and Uri Shulevitz does a good job of weaving in text and illustration considerations. Try one for your own stories. You just might be enlightened on how to craft a better picture book.

Wednesday, March 26, 2014

Be Smart - Use a Dummy! by Patricia Toht

Are you a picture book writer? If so, you need a dummy.
No, not this!


No, Brits, not this either!

A picture book dummy. Illustrators make great use of them – sixteen sheets, clipped together, that help to plan the layout of a book. (Check out Uri Shulevitz here or Brian Selznick at Tina Burke's blog.)

But I’m a word girl. Stick figures are the height of my artistic ability. 


I’m not keen with scissors or rubber cement, either. So I use a “down and dirty dummy” or DDD.

Here’s how I do it (VERY little skill involved):

Take a blank piece of paper.
Fold in half, long edge to long edge. Fold in half again.
Open the paper up. (You'll have three creases lengthwise.)
Now fold short edge to short edge. Fold again. And again.
Open up. (You’ve added seven creases crosswise.)
Your paper now has 32 little boxes. (Most picture books have 32 pages).
Add page numbers.
Mark each spread.
Voilà! There’s the DDD.


(I've inked in the crease marks, so you can see them.)

Sometimes I use a DDD to study a book that I like, noting where the problem occurs, three-part movements, clever use of illustrations, etc.

My study of The Little Old Lady Who was Not Afraid of Anything,
by Linda Williams, illustrated by Megan Lloyd

Mostly, I use a DDD for laying out my own text.

In the US, the first few pages are business-y stuff, so X those out. That leaves 14 to 14 ½ spreads. (When I lived in the UK, I had to fit text into 12 spreads – TWO fewer! Yikes! See Tara Lazar's explanation of the different treatment of end pages.)

Next, add story. Don’t write down every word, just enough to know what falls on each page.

Erase and try again and again, until you get everything to fit.

Then return to your typed manuscript and mark the page breaks.

Now what?

Here are some things I look for:
• Will there be a variety of illustrations? No variety = BORING!
• What text could be cut because it will be shown in the pictures? Leave room for the illustrator!
• Still too many words on a page? Tighten!
• Do key parts of the story happen in the right places? Check out this great post by Miranda Paul on pacing.
• Is the reader encouraged to read on? Pop those page turns!
• Are the words on each spread perfect for that spread?


This practice is one of the best things I’ve done to improve my picture books. I now use a DDD for every PB I work on – fiction, nonfiction, and even poetry collections. 

Give one a try!